
Welcome
Thank you for purchasing TimeBandit X v.8.0. or for downloading the Trial version.
Note: This manual applies to both the full licensed version of the application and the feature limited, Trial version.
Details of the Trial versions limitations can be found here. If you are using the Trial version, Please Note: It's NOT possible to change the Trial version into the full version. If you decide to purchase a license, you will receive the new full version of the application along with your Licence number and Activation Key Code.
At any time during your trial you may purchase a license to use the full version, How to Order details are listed at the end of this document.
TimeBandit X 8.0 is a very easy to use time tracking application for intel based Apple Macintosh systems running MacOS X 10.12 or above. If you need to keep track of the dates and times you spend on tasks while working at your Mac for billing purposes, then this is the application for you.
You can use TimeBandit X to keep track of multiple jobs for multiple clients and easily switch between active jobs to capture the time spent on each one as you go through your working day. TimeBandit X records a unique entry for each job every day. So in your list you will have many entries for each job you are working on. To continue timing the same job the next day (or any time in the future) just select the job in the list and Start the timer. TimeBandit X will automatically make a duplicate job entry for you using todays date.
Then at the end of the day/week/month or whatever your billing period may be, you can export this data for use in a database application or a spreadsheet. If you prefer, you can also print a hard copy of the data for yourself or for presentation with your invoice to your client.
While this manual is only available in English, TimeBandit X currently supports the following languages: English and Swedish. If you would like to see it support your native language or better yet, you would like to offer to help us to translate it. Please get in touch using the email address at the end of this document.
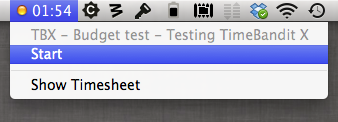
To start TimeBandit X, double click the application icon in the Finder. After a few seconds you will see that the main menu at the top of the screen displays TimeBandit X next to the Apple icon.
If this is not the first time you have used the application, then along with the main menu changing, you may also see the last timesheet you were working on (if you have the Auto Open option selected in your TimeBandit X Preferences). [See Fig.1 below]
If this is your first time using the full version of TimeBandit X, you will need register the application with your name, user license number and product activation key [sent to you via email when you purchased the license]. In all first use cases you'll then need to add at least one item to the Operation List before you can start to time your jobs. TimeBandit X will warn you that you need to do these things as it runs for the first time and it will automatically open the Preferences dialog at the Operation List tab for you. [See The Operation List below for further instructions]
TimeBandit X needs to access your Contacts application and Notification Center in order to work properly. Your system will ask you to allow this access.
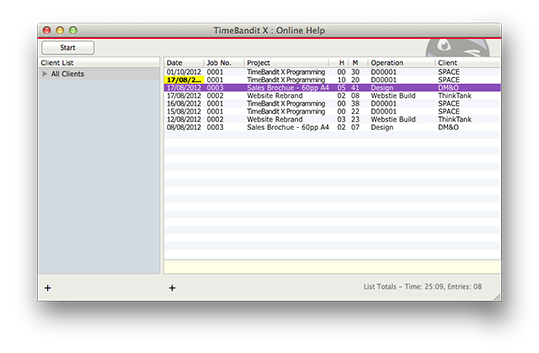
To Start a new timesheet file, choose File | New Timesheet... from the menu bar [or press the Command+N keys together]. You will then see a Save As dialog box which asks you to name your new timesheet file and to choose a location in which to save it onto your hard drive.
Once you have given your new file a name and location, a new timesheet window will appear. The timesheet window title bar will show a TimeBandit X file icon and your timesheet name. In the example given in Fig.1 below, the timesheet file is called Online Help v7. This allows you to quickly see which timesheet file you are working with.
You can only have one timesheet file open at a time, but you can work with as many timesheet files as you need. We would suggest that you start a new timesheet once a month or whenever your billing period changes. This keeps the timesheet files small and the job list shorter and more manageable.
Initially, the list part of the timesheet will be blank [because there are no jobs added yet], the Status Indication Line along the top of the window will be Red [Stopped] and the Client list on the left, will show the default - All Clients.
Next we need to add a new job.
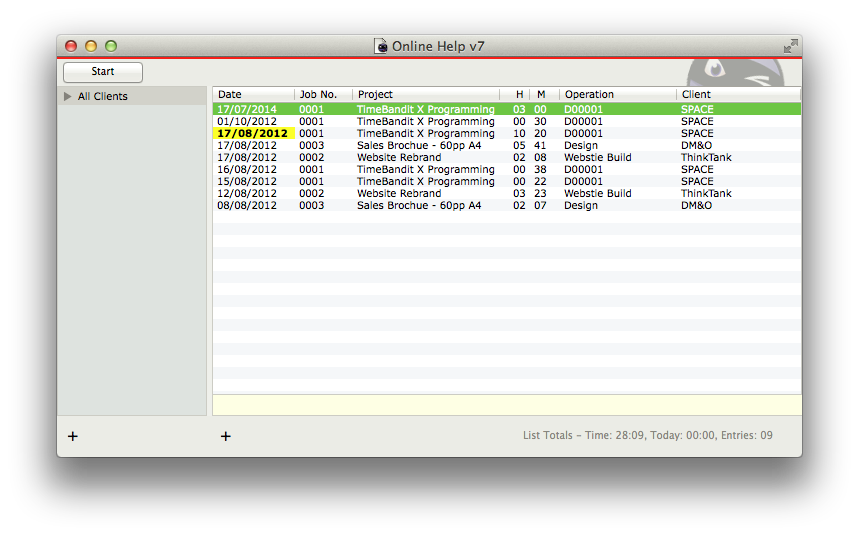
Fig.1 The main Timesheet window
TIP: You can re-size any of the columns in your timesheet by dragging in between the headings and you can re-order the list by clicking on any column title.
If you have any previously saved TimeBandit X files, you can either choose File | Open Timesheet... from the menu bar [or press the Command+O keys together] and then navigate to your saved file to open it, or double click on its icon in the Finder to launch the application, re-open the file and continue to add new items to its list.
NOTE: If you double click a timesheet file in the Finder when you already have a timesheet open, TimeBandit X will stop timing any running job and then save and close the current timesheet, before opening the new file.
If you want TimeBandit X to automatically open the last timesheet you were working on, choose Preferences... and then choose the General tab, here you can switch on the Auto Open Recent Timesheet option, which will automatically open the last timesheet you were working on when TimeBandit X was closed. This feature is not available in the Trial version of the application.
To add a new job to your timesheet, either click the [+] at the bottom of the timesheet list, choose Edit | Add Job... from the menu bar [or press the Command+J keys together].
The Job Information dialog sheet will appear. [See Fig.2 below]
![]()
Fig.2 The Job Information sheet
Todays date will be auto selected. To change the date, you can either click in the field and key in a new date or use the little arrows button to move back and forth. If you key a date, you will need to click the arrows up and down once to refresh the weekday.
Next, key in a Job Number/Order Number for the project you are going to be working on [Step 1 Fig.3 below]. You can auto-enter information from your Preset Jobs list if you are using one by clicking on the blue popup menu button to the right of the Job No. Field and then select the job you want from the list. If you want to add a new entry to the Preset Jobs List while the Job Information sheet is open, either choose Edit Preset Jobs list from the top of the blue popup menu to open the Preset Jobs list or enter the Job information in the fields first and then choose Add to Preset Jobs List from the blue popup menu.
If you have recently added an entry to the blue popup menu, but you don't see it there, choose Refresh List from the top of the menu to force your new item to appear.
Choose a Client from the drop-down list [Step 2 Fig.3 below]. If the list is empty, or a recently added client does not show up, you can choose Sync with Contacts to automatically add every contact which has a Company Name associated with its entry from your Apple Contacts Book. There is also an Add New Client option in this list, to enable you to quickly add a new client name and company details to your Contacts Book. You will need to open the Contacts application itself if you want to add full details, such as address, phone and email data to a new client entry.
Before your new job is accepted, you will need to choose an operation from the drop-down list [Step 3 Fig.3 below]. If you want to add a new entry to the Operation List, choose Edit Operations from the top of the menu.
However, if you have recently added an entry to this list but it is not visible, choose Refresh List from the top of the menu to force your new item to appear.
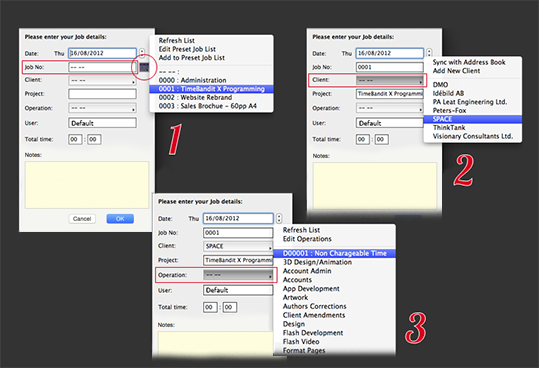
Fig.3 Edit The Job Information sheet
The User field will already contain the MacOS X default user or the name you set in the Preferences dialog.
You can also optionally enter some time into the Total time: Hours and Minutes fields.
When you are finished, hit the [Return] key or click the OK button. This will add the new job information to the timesheet window. You can also hold down the Command key which will turn the OK button into a Start button. This allows you to enter your job information and then start timing as soon as the Job Information sheet is closed.
To start timing a job, select the job you want to time in the timesheet list and then click the Start Button, choose Start Timer from the Control Menu in the menu bar or press the Space Bar on the keyboard (when TimeBandit X is the active window). The Status Indication Line along the top of the window will turn Green, the timesheet list will become locked and the Start [or First Start] button label will change to Stop. Also notice that the floating Status window [if shown] turns Green when the timer is running - this is to indicate the status of the timer when the main window is hidden, minimised or is behind a stack of other windows.
The total elapsed time in the Hours and Minutes columns in the timesheet window will increase at one minute intervals for as long as the job is being timed.

Timer Running - Main Window
To stop timing a job, click the Stop button, choose Stop Timer from the Control menu or press the Space Bar on the keyboard (when TimeBandit X is the active window). The Status Indication Line along the top of the window will turn Red and the timesheet list will become unlocked for editing again. The button text will change to Start.
Notice that the List Totals: at the bottom right of the window are updated. As you add new jobs to your list, the total entries will increase and the total time will show all job times in the list added together. The today total adds up the total time for all jobs with todays date.
Important note: Whenever you Start or Stop timing a job, TimeBandit X will automatically save the timesheet for you. This is done to safeguard your data against a system crash. If for some reason you have to restart your machine while you are timing a job, you will be able to carry on from where you left off. The time it takes to restart your machine will be included on the job (you can manually remove this extra time if required or you can set your application preferences to stop timing on quit).
We would strongly recommend that you make a backup of the current timesheet file to safeguard your valuable timesheet data against accidental deletion or file corruption.
The Operation List is the place where you can store the types and descriptions of the operations you are going to perform while doing your job. You don't need to put every type of operation in at once, you can come back to this list at any time to add or remove entries. [See Fig.4 below]
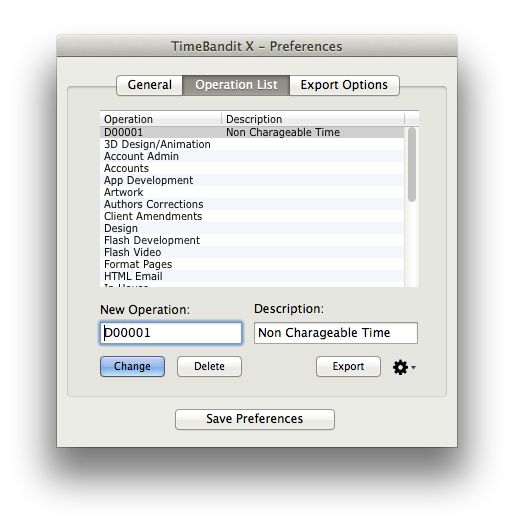
Fig.4 The Operation List
To open the Operation List at any time, choose Preferences... from the menu bar [or press the Command+, keys together on the keyboard]. The Preferences dialog will open, you can then choose Operation List from the tabs at the top of the window.
To add a new entry, click in the New Operation: field below the main list box to make it active and type in an operation such as "Coffee Break". You can use letters or numbers here. You can also optionally enter a Description to help you choose the operation later if your company uses only numbers for operation types. Press the Return key on the keyboard or click the Add button to enter your operation in the main list box.
You can carry on adding more operations if you wish or come back to the list later.
If you want to make any changes, you can select the entry in the main list box for editing and change it.
To remove an entry, click in the list to select the entry you want to remove and then click the Delete button. When you have finished adding operations to the list, click the Save Preferences button at the bottom of the dialog to close and save your entries in the TB Opps List preferences file.
You can drag any entry in your list to re-order its position or click on the header to sort the list alphabetically.
To clear the New Operation field when editing in a long list, just double click anywhere in the list.
See below for information on exporting your Operation List for use on another machine and for help with using a Group Operation List.
You can use this list to store your frequently used Job Numbers and Client/Project information.
Then whenever you need to add a new job to your timesheet which uses this data, you can just select it from the blue popup list to the right of the job number field in the Job Information sheet to save you having to type in the information all over again.
To open the Preset Jobs List, choose File | Preset Jobs from the menu bar [or press the Command+B keys together on the keyboard]. [See Fig.5 below]
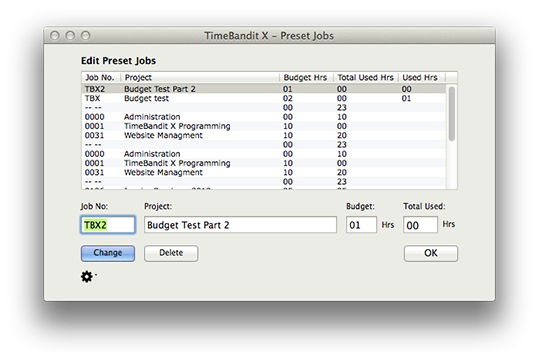
Fig.5 The Preset Jobs List
To add a new entry, first click in the Job No. Field below the main list box to make it active and then key in your information, press the [tab] key to move into the next field and so on. When the information is complete, Press the [Return] key or click the add button to add your new entry to the list.
If you want to make any changes, you can select the entry in the main list box for editing and then change it. Make sure you press the Change button to apply your amendments.
To remove an entry, select it in the list and then click the Delete button. When you have finished adding jobs to the list, click the OK/Close button at the bottom of the dialog to close the window and save your entries.
You can if you wish, import a tab delimited text file into the Preset Jobs list, just click the gear icon choose import from the pop-up menu and then navigate to the file you want to import. You can use exported data from TimeBandit X itself, a spreadsheet, database or word processor application, as long as it is saved as text only using the following format:
Job number 1 [tab] Project Name 1 [tab] Budget 1 [tab] Total used 1 [return]
Job number 2 [tab] Project Name 2 [tab] Budget 2 [tab] Total used 2 [return]
Job number 3 [tab] Project Name 3 [tab] Budget 3 [tab] Total used 3 [return]
Job number 4 [tab] etc...
Any entries imported in this way will overwrite your current list.
Note: Make sure the data you wish to import does not contain any colons (:) or hyphens (-) as these are invalid characters and will cause data display problems.
You can drag any entry in your list to re-order its position or click on the column headers to sort the list.
To clear the entry fields when editing in a long list, just double click anywhere in the list.
See below for details of how to Export your Preset Jobs List.
The Preset Jobs List contains a Budget: Hrs field and Closed Total: Hrs field. You can input the time in hours that you have budgeted for the job and any previously used 'Closed' hours for the job. TimeBandit X will track the time spent on the job throughout the current timesheet list, any full hours will be displayed in the + Active Timesheet Hrs column. TimeBandit X will highlight all of the entries in the list with red when the budget time is reached or has passed.
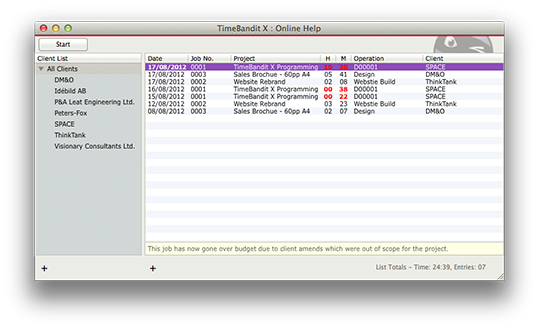
Main Window - Showing an over budget job
A feature of version 8.0 is Notifications for the budget feature. If you have allowed Notifications for TimeBandit X in your System Preferences, the application will notify you up to one hour before the budget limit is reached. You will only receive one budget notification per job while TimeBandit X is running. These notifications are sent as the application is launched and when the final hour of the allocated budget is reached during the current session. If you quit and re-launch TimeBandit X, you will receive notifications again for any jobs in your list which still have 1 hour or less of budget remaining. The style of notifications you receive will depend on how you set your System Preferences, some examples are shown below.
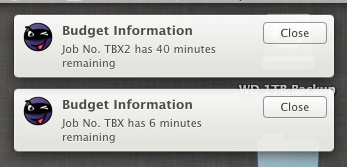
Alert Notifications

Notification Center List
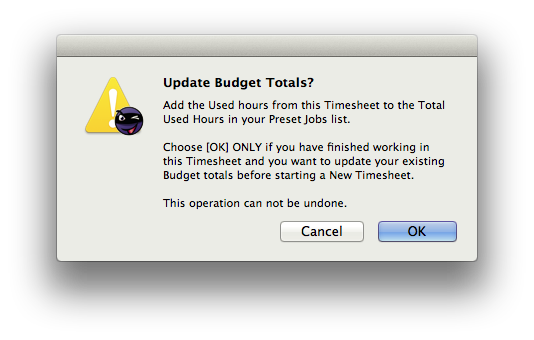
Version 8.0 can also track your budgets over multiple Timesheets. In order to use this feature you just need to choose Close & Total Budgets... from the file menu when you have finished working in your current sheet (at the end of the week/month for example). You will see the warning dialog box [below]. Click OK to add the time from the current timesheet to the Closed Total Hrs. column in the Preset Jobs list. NOTE: At this time, this operation will only add any FULL hours used to the totals. For example if a job has a total of 2hrs 59mins in the timesheet, the Close & Total Budgets command would only add the 2hrs to the total. You may wish to manually alter the totals in this case. To work out the total time spent so far, add the two figures in the 'Closed Total' and '+ Active Timesheet columns' together.
If you don't want to use the Budget tracking features, just leave the Budget Hrs: and Closed Total Hrs: fields blank when you are entering your Preset job information. Two zeros will be inserted automatically.
You can enter and save a default user name which will be used in the Job Information and Print dialogs.
Choose Preferences... then in the box on the General tab, type in the name you want to use as the default user. Click the Save button to store your change in the application preferences file.
You can use the No Activity Warning drop-down list in the Preferences | General pane to set a period of time for TimeBandit X to warn you if there was no mouse activity. The options are None, 5 minutes, 10 minutes or 15 minutes. If you choose anything other than None, TimeBandit X will continually watch your mouse to see if it stops moving, then when the period of no mouse activity reaches your preset, a dialog will appear to warn you - the timer continues to add time to the selected job in the background.
Once the dialog is on screen you have three options. You can either press Reset, which will take the elapsed period of inactivity away from the current job, choose Continue to keep the period of inactivity and carry on timing the job or choose New, to add the period of inactivity to a new job.
If you want to remove a job from the timesheet list, you have three options. Select the job you want to remove and press the backspace key on the keyboard, right click the job in the timesheet list and Choose Delete Job... from the menu or choose Edit | Delete Job... from the menu bar. In either case, you will see a dialog window on screen with four delete options.
You can delete just the selected job, all jobs with the same job number, all jobs with the same date or all jobs with the same month as the selected job. You will not be asked to confirm the deletion and there is no undo for this operation, so if you make a mistake you must immediately close the timesheet and DONT SAVE it when asked.
If you want to open another timesheet file to the one you are currently working on, you can close the current timesheet and then open another one.
Click on the Red traffic light button at the top of the timesheet window or choose File | Close from the menu bar or just double click another timesheet file in the finder.
If you accidentally remove a job[s] and you want to get it/them back. Immediately close the timesheet or Quit the TimeBandit X application and when prompted DONT SAVE, then re-open the timesheet file you were working on - any unsaved changes to your data will then be restored.
If you have closed the timesheet window by choosing the Close menu item or by clicking the red traffic light button. Just choose File | Open Timesheet... from the menu and re-open the timesheet file you were working on.
If you need to change any of the parameters of a job in the timesheet list, just double click on the job to open the Job Information sheet. [See Fig.2 above] You can also select a job in the timesheet list and choose Edit | Job Details from the menu bar [or press the Command+F keys together].
The Edit Job Information sheet looks just like the New Job Information sheet, except that it's already filled in with the information from the list.
You can change everything about the selected job from this window - when you're done, click OK or press [Return] to make the changes. Don't forget Save your file after you edit a Job.
On the left hand side of the main timesheet window is the Client List. You can use this list to Sync the Contacts in your Apple Contacts application with TimeBandit X, you can add a new client to the list and select a particular clients' jobs for display in the main window.
When you choose File | Sync Client List with... from the menu bar for the first time, TimeBandit X will automatically create a new group in your Apple Contacts named TimeBandit X Clients [or whatever is common convention in your native language]. Using your Contacts application, you can then drag any of your Contacts into this new Group and the next time you choose Sync Client List with..., the Contacts in this group [which have data in their Company fields] will appear in the TimeBandit X Client List. This means that you don't have to key the information in twice or maintain two lists, as any time you add a new Contact to your TimeBandit X Clients Group in your Contacts application, you just need to re-Sync the list in TimeBandit X for the Company name to appear.
There is also an Add New Client button at the bottom of the Client list. This enables you to quickly add a new client name and company details to your Contacts. Note: The new Contacts details will appear in the main contacts list and in the TimeBandit X Clients Group in the Contacts application. In addition, you will need to open the Contacts application itself if you want to add the full details, such as address, phone and email data to a new client entry.
After you have added a New Client in this way you will need to Sync the list with your Contacts application for the new entry to appear in the list.
If you have a very long list of jobs in your timesheet with lots of jobs for different clients running concurrently, you may like to be able to see or edit all of the jobs for a particular client in one short easy to read list. In order to do this you can split the main window into two parts using the Client List. [See Fig.6 below]
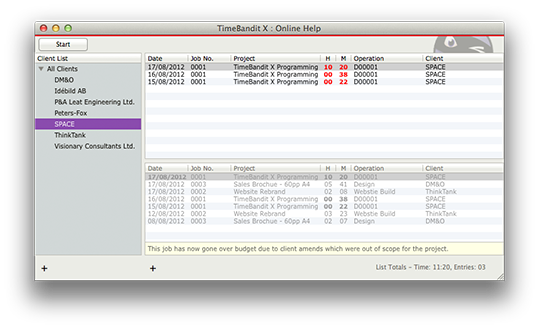
Fig.6 The split Timesheet window, showing the Single Client List at the top
TIP: You can resize the two list panes buy clicking and dragging on the separation bar between them [it will turn dark grey when it is selected].
In the example Fig.6 above, the user has chosen SPACE from the Client List and now the top part of the window displays only the jobs for SPACE in a shorter list. The bottom part of the window shows the main list, [which includes SPACE] but is greyed out to indicate that you can not select/edit it.
While the timesheet is in this Single Client mode, you can continue to use TimeBandit X just as before, but you will only be able to select or edit the jobs from the Single Client List at the top.
Note: You can not add a new job for different client while you are in Single Client mode. If you want to add a new job for a different client or want to change the client name in an existing job, you will need to switch back to the main list first. You can switch back to the main list at any time by choosing All Clients from the top of the Client List.
Using the Single Client mode will not stop you from being able to export or print data from the main list. This means that if you choose to export or print all jobs when you are using the Single Client mode, you will still get all jobs in the current main list. If you wanted to export or print just the jobs in the Single Client List, there is an option to do this in the print or export dialog box.
To allow you to quickly see which job is selected and what its status is at all times, we have included a small floating status window which can appear above all the other windows in the same space as the main TimeBandit X window. [See Fig.7 below]

Fig.7 The Status Window - Timer is not running
The Status Window is shown automatically when you first use TimeBandit X but you can hide it if you don't want to use it. To change the view for the Status Window choose Preferences... and then select the General tab. At the bottom of the tab you will see the options for the Status Window. You can choose to Show or Hide the Window and choose how transparent the floating window is by adjusting the slider control.
Once the Status Window is on screen, you can drag its title bar to move it out of the way and click the button on the right to Start/Stop the timer.
You can right click on the status window to open a menu which allows you to switch active jobs without bringing the TimeBandit X window to the front. This list shows only the most recent entry for each unique job in your main list.
The Status window shows the Job Number, Project, Operation and Elapsed time for the selected job in the list. Its background colour is Red when the job is stopped and Green when the job is running.
Note: The Status Window shares the same "Desktop space" as the TimeBandit X application. If you switch spaces, the Floating Status Window will not be visible unless you move TimeBandit X into the same space too.
Also, in version 8.0 we have the Menubar Widget. This shows a traffic light indicator icon and the elapsed time for currently selected job. You can use its menu to Start/Stop the timer (from any Desktop Space) and use it to bring the Timesheet window to the front. This menu does not appear if there is no timesheet window open.
If your machine should crash or you Force Quit TimeBandit X while you are still running a job, it will auto-check, warn you and select the running job again when you next open the timesheet which was active when the application was quit. This saves you having to check for yourself and avoids you running two jobs at the same time.
Because TimeBandit X uses the date to log your job times, you'll get several entries in your timesheet list for the same job number as you work on a job for more than one day.
If you need to quickly see how much time a single job has taken overall. Right/Command click on the job and you'll see the current total in brackets next to the Job Total in the menu. Alternatively, Select a job in the list and choose Edit | Job Total... This will open a small dialog box which adds up the time for every job in your list with the same job number as the selected job regardless of its operation.
If you want to see how many hours you have worked in a particular day, select a job in the list which was started on the day you want to total and choose Edit | Day Total... This will open a small dialog box which adds up the time for every job in your list with the same date as the selected job. The total time for today is always listed in the timesheet window.
You can easily duplicate a timesheet entry to save wearing down your fingers with all that typing. You just choose the entry you want to make a copy of and then choose Edit | Duplicate Job... from the menu [or press the Command and D keys together].
To sort your timesheet list, click on any of the timesheet column headings. Note: Sorting the list while you have a Single Client selected, will also sort the main list using the same column heading.
You can also sort the Operation list and Preset Jobs list by clicking on their column headings.
You can choose any typeface that is available to your computer (at the launch of the application) for on-screen display and print. There is also a choice of font size between 9pt, 10pt and 12pt. Choose Preferences... and then select the General tab to change the current selection. The current typeface and size are saved in preferences when you quit the application.

The General tab of the preferences window (shown in Dark Mode)
If you are running MacOS Mojave, TimeBandit X v.8.0 fully supports 'Dark Mode' and it will automatically change its appearance when you switch between modes in your System Preferences.
The Print Options dialog contains a Title text: field and a Show Date tick box.
The Title text is the text that appears at the top of your paper above your timesheet list when you print from TimeBandit X. If you want to change the default text, you can type anything you like in the field and then click the Save button.
You can also choose to show or hide the date on your printed output by clicking on the Show Date tick box.
To print a hard copy of your timesheet list, make sure you have a printer selected then choose File | Print... from the menu bar [or press the Command and P keys together]. You'll then see a dialog where you can choose what to print from the following options:
All Jobs
All Jobs with the selected Job Number
All Jobs with the selected Date
All Jobs with the selected Client
Once you have chosen what to print, you will see the Page Setup sheet and then the standard print sheet. It's best to choose a landscape format for your prints as this is the same aspect ratio as the timesheet list.
To export the current timesheet list as a tab delimited text file for use in another application such as a spreadsheet or word processor. Choose File | Export from the menu bar [or press the Command and T keys together].
You will then see a dialog where you can choose what to export from the following options:
All Jobs
All Jobs with the selected Job Number
All Jobs with the selected Date
All Jobs with the selected Client
Custom selection
If you choose Custom selection, a sheet window will appear where you can choose which selection of the jobs in your list to export. Drag the cursor or hold down the shift key to select multiple adjacent items or the press the Command key to pick any other combination.
Once you pick what you want, you will see the standard file save dialog, from which you can choose a name and location to store the exported file.
NOTE: The file will be exported using the options saved in the Preferences dialog box. You can change the way your files are exported by using the tick boxes on the Export Options tab.
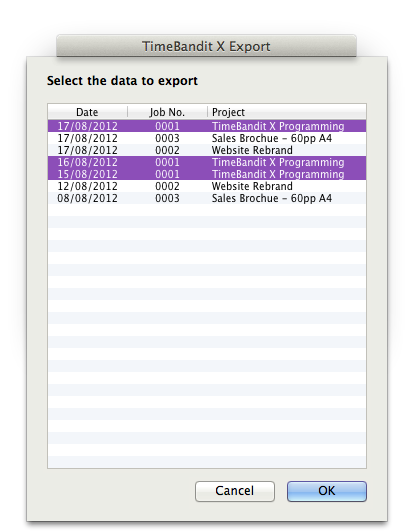
The custom export sheet
If you want to set up and use a standard Operation list for all TimeBandit X users in your company, you can easily export a copy of your current list. First choose Preferences... from the file menu. Next choose the Operation list tab, here you will see a button marked Export. If you press this, a copy of your current list will be created on your Desktop. You can then copy this exported file into the other users [user name]/Library/Preferences folder, overwriting their existing file (DO NOT rename this file).
If you are a systems administrator and you don't want anyone to be able to modify their operation list, you can use a group operation list which can be kept on your file server.
To do this, follow the instructions above to create the file but instead of putting a copy on each users machine, just put one copy anywhere on your server (You may rename this file if you like). Next, instruct each of your users to select the Gear icon in the Operation List tab of the Preferences window and then to choose the Group Operation List menu item. Next navigate to your group operations list file on the server and choose this as their operation list. Once this is done the local Operation List will be locked.
While a Group Operation List is **Active** the local user can not export the operation list or add, remove or modify entries. If the file server can not be found on the network or the Group Operation List file is deleted, renamed or moved after it has been chosen, the local machine will put up an error - file not found dialog box until the situation is fixed. If you need to return to using the local Operation List (on the users machine) for any reason, just choose the User Operation List from the Gear icon pop-up menu. Doing this will also allow you to choose a new group file again if required.
You can choose to export your current Preset Jobs list to use either as a backup, an alternative list or as a template file to import into another copy of the application.
Click on the gear icon in the Preset Jobs window and choose Export from the pop-up menu. A copy of your current Preset Jobs List will be created on your Desktop.
View Timesheets in a Browser/Status Board for iPad
You will need to activate the Net Link option in the Preferences dialog and click the Connect button before you can use this feature. When you choose the View in Web Browser option from the View menu. TimeBandit X will display your current timesheet in a new window using your default web browser application. This serves as a confirmation test that the Net Link feature is working.
If you are using an internal Firewall you may need to open port 2000 to allow the timesheet data to be requested and sent from your machine.
You will find it more convenient to use a fixed IP address for the computers on your network if you want to use the Net Link feature (contact your systems administrator to find out about this) then you or anyone else on your local network, can remote view a TimeBandit X timesheet.
To remote view a TimeBandit X timesheet, open your web browser application and then - in the address field - key in the IP address of the remote machine, followed by :2000 - eg. http://192.168.0.123:2000 - If the remote machine has a copy of TimeBandit X running, and it has the Net Link feature activated, the timesheet data will be returned to your browser and updated every minute for as long as you are connected to it.
To remote view a TimeBandit X v.8.0 timesheet on your iPad using the Panic Status Board app, launch Status Board on your iPad and touch the gear icon in the top left corner to enter edit mode. Next drag a 'Do-It-Yourself' icon to the grid and size it to your liking. In the DIY Panel URL enter the IP address of the computer running TimeBandit X followed by :2000 - eg. http://192.168.0.123:2000 - If the selected computer has a copy of TimeBandit X running, and it has the Net Link feature activated, the current timesheet data will be shown on your Status Board and updated every minute for as long as you are connected. If you want to manually update the Status Board display, just triple tap on the TimeBandit X DIY panel.
TimeBandit X timesheets can contain Job Notes. This feature allows you to attach a note of up to 256 characters to any entry in your timesheet. This is useful if you need to remind yourself of something or if you need to supply some more information about the job being worked on.
To attach a note to a job, just enter the note into the yellow note area at the bottom of the job editor sheet. Alternatively, right click or hold down the [ctrl] key and click to select the entry in the timesheet list, then choose Job Notes from the context menu or select the entry and choose Edit | Job Notes... [or press the Command+E keys on the keyboard]. In either case, the Job Notes window will appear. Type your notes into the yellow area and then press the OK button to add the note to the timesheet. The note window will allow you to type a return character but this return [new line] will be removed and replaced with a space when the timesheet is exported. When a note is attached to an entry, the date column of the entry will appear in yellow with bold text.
Main Window - Showing note marker on second entry
To amend or remove the note data, Right click or hold down the [ctrl] key and select the entry with a note attached or choose Edit | Job Notes... from the menu (use the keyboard shortcut above) or double click the entry and then press the note button in the Edit Job dialog. Leave the yellow note area blank to remove the note.
You can choose to show/hide the first line of your notes at the bottom of the timesheet window by choosing View | Show/Hide Notes in Timesheet from the menu.
You can select an entry in your timesheet and reset its date to today and zero its recorded time. To do this, just select the entry you want to reset and then choose Edit | Reset Row from the menu [or press the Command+R keys on the keyboard]. If you want to reset every row in your timesheet, hold down the [Alt/Opt] key and then choose Edit | Reset All Rows from the menu.
At the bottom of the General tab in the Preferences dialog you'll find the Check for Updates Dropdown list. Click the list to choose when to automatically check our website for updated versions of TimeBandit X. The choices in the list are: Off (Never auto check), On Launch (Checks every time TimeBandit X is launched, Daily (Checks once on launch and then every day at the same time if TimeBandit X and your computer are running) and Weekly (Checks once on launch and then once a week if TimeBandit X and your computer are running). If you choose [Off] or would like to check at any other time, you can manually check by using the Check for Updates... option in the TimeBandit X Application Menu.
If TimeBandit X finds a later version on our website, it will launch an update options dialog window to allow you to update your application. Please follow the instructions in this dialog to download and install your new update.
If you have been using a previous version of TimeBandit X and you'd like to upgrade to the latest full version of the application, it's super easy to do! Visit our online shop and select TimeBandit X, add it to your cart. At the checkout, enter your discount code* if you have one and tap the update button to apply the discount then pay via PayPal. You will receive (via email) the URL to download the latest full version of TimeBandit X and a copy of your updated Licensed User serial number(s) if required.
*You may qualify for a discount on the full price of the new version. If you are a qualifying customer, we will have sent you a promotional code via email, which you can use in our online shop to receive a discount on the latest full version. If you don't have a promotional code but would like to check if you are eligible for the discount, please send us an email.
Thanks for your interest in our TimeBandit X software. Please help us to continue the development of this and other applications for the Apple Macintosh by purchasing and registering the full product. Here's how...
Purchase Online - You can choose TimeBandit X Menu | Purchase TimeBandit X while you are running Timebandit X and - as long as you have an internet connection - you will automatically be taken to the TimeBandit X order page on our website. You can make your payment via PayPal using your PayPal account or a credit card. Once we receive an order conformation from PayPal, we will send you the full product download URL and your Licensed User serial number(s) by direct email to the email address you provide with your order. Please allow at least 48 hours for this to happen.
If you don't want to purchase now, but would like to request new features, report bugs you have found with the software or just to say Hi, please email us at the following address.
The current Trial version 8.0 is fully functional except that you are limited to; Only five [5] active entries in your timesheets, Only three [3] Preset Jobs, The Export and Print functions for any of the data in TimeBandit X is disabled, The Auto-open recent timesheet preference and the Net-Link features are non-functional. In addition, any new or amended features as described for the full version above, may not be included in the Trail version.
We believe that the limitations of the Trial version will still allow you to see the full potential of our software and help you in your decision to purchase a license to use the full un-restricted version.
The TimeBandit X software (in all formats and versions) is provided "as is" with all faults and without warranty of any kind. It is provided on the basis that if it causes any damage, either physical or financial to yourself, your machine or your business then we are not to be held in any way responsible whatsoever. By using the TimeBandit X software you agree to be bound by the conditions herein and you waive any rights you may have to seek any form of compensation whatsoever from ourselves or any of our family, friends or associates. All rights reserved. TimeBandit X is not in any way associated with any other computer software title(s) with a similar name.
Known issues:
None reported as of 1st March 2019
Our special thanks go to Anders Täpp translated the interface into Swedish! Thanks also to Laszlo Falvay who provided us with the image in the About box and the Icons that TimeBandit X uses. Thanks to Kem Tekinay for providing the Kaju update engine that TimeBandit X uses to provide over the Internet updates and thanks to everybody who contributes to the Open Source MacOSLib project, parts of which are included in the TimeBandit X application code.
TimeBandit X v.8.0 is for use on Intel based Apple Macintosh systems running Mac OS X 10.12 or above.
©2019 Graham O'Connor SPACE software
This manual was last updated on: 1st March, 2019